
Session recaps are amazing and include everything from AI generated summaries, interactive transcripts and recordings to full participant list, chat logs, notes, resources, poll results, and GIFs. All neatly packaged into one simple page ✨
So if anyone’s ever asked you for that link you shared in the chat, you can just point them to the recap!
- 1. Walkthrough: Recaps
- 2. What are recaps?
- 3. Where to find your recaps?
- Recaps overview page
- Recaps on your dashboard
- Recaps in rooms
- Recap emails
- 4. Recap overview page
- Search & filters: Find exactly what you need
- Recap history
- 5. Recap elements
- Recap page
- ⏯️ Recordings: Your session replay
- Multiple recordings
- Trimming your recording
- 🧠 Summary: AI powered summary generation
- 🕓 Timeline: Interactive transcript with agenda and events
- ✨ Highlights: Capture and share key moments
- 💬 Chat history: Every message sent
- ✍️ Notes: Shared and Personal
- 📊 Engagement: Analyse session and participant engagement
- Session engagement
- Participant list and engagement
- ⚡ Session GIFs: Spreadable snippets
- 💭 Participant feedback
- 🗂️ Resources & links
- ✅ Poll results
- 6. Sharing recaps
- Sharing with collaborators
- Sharing with participants
- Sharing via link
- Sharing settings
- 7. Recap storage and history
1. Walkthrough: Recaps
Here is a quick introduction to the recaps in Butter. Dive into any details below the video. Enjoy ⛱️
2. What are recaps?
In short, recaps are detailed replays of your sessions. It captures and compiles everything from your recordings, participant list and session transcripts to your AI generated summaries, chat logs and all of the resources used in the session.
See all elements in the recap here:  Recaps - 5. Recap elements
Recaps automatically generated after every session you host on Butter and available immediately after the session. Each recap has it’s own unique URL and can easily be shared with both colleagues, participants and anyone else who need access.
Learn more about sharing here: Recaps - 6. Sharing recaps
Alright, let’s dive into the more practical side of things!
3. Where to find your recaps?
There are a few different ways to find your recaps.
Recaps overview page
From your Butter dashboard you can find all of your recaps by going to the sidebar and clicking on Recaps. The recaps overview page will have all the of the recaps from sessions you have hosted and participated in, as well as sessions from rooms in which you are a collaborator.
You can search and filter through the recaps to find exactly what you need. Read more about the .
Recaps on your dashboard
Your two latest recaps will always be available directly on your dashboard. This will update automatically as new recaps are generated.
Recaps in rooms
You can find recaps in any one of your rooms. In the room, you will only see recaps from that particular room. You find the recaps in your room by going to the room setup and navigating to Recaps in the tab menu.
Recap emails
You can choose to subscribe to get an email notification whenever a new recap has been generated. To subscribe to recap emails, go to your Personal settings on your Butter dashboard and enable Notification emails.
4. Recap overview page
The Recap overview page is the full directory for all of your recaps.

Search & filters: Find exactly what you need
At the top of the page, you will see a large search input field. You can use this to search for
Below the search bar, you will see a few filters. These are great to help you when you don’t quite remember what you’re looking for and need to narrow down your options.
Available filters:
- Date: Set the exact date or timeframe in which you want to see recaps from.
- Contains: Check to only include recaps with specific elements (e.g. chat or notes)
- Sessions: Choose to see all recaps available to you or only recaps from sessions you have attended
- Favorites: Only show recaps that you have favorited
Recap history
Recap history determines how far back you can access your recaps.
- Free workspaces have 7 days of recap history.
- Starter workspaces have 45 days of recap history.
- Pro and Enterprise workspaces have unlimited recap history.
Read more about Workspace plans & pricing
5. Recap elements
Each recap captures a lot of data from your sessions and compiles everything in an easy to digest manner. Below we’ll go through the different elements and how you can use them.
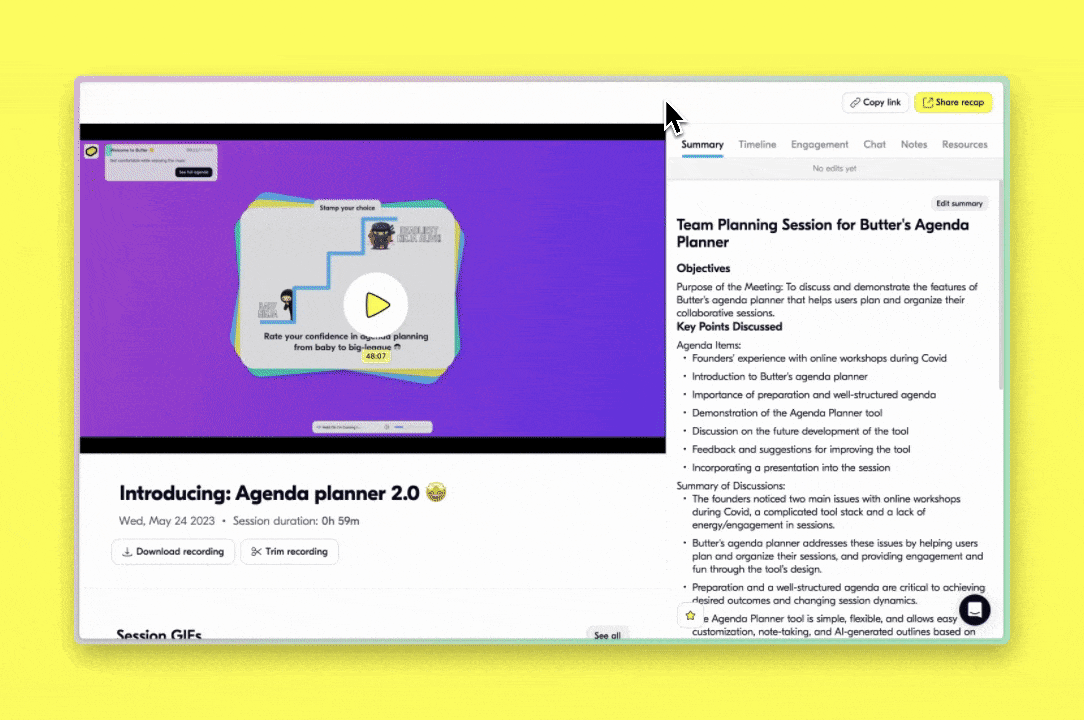
Recap page

Each session has a unique recap page. The recap page stores and structures all of the information in a simple and accessible way.
You can edit the title of your recap by clicking it and writing your new title. The changes take effect immediately.
The recap page is split into two halves. On the right hand side, you can use the tab menu to navigate to all of the different elements in the recap.
In the top right of all recaps, you can access sharing and access settings. Read more about Recaps - 6. Sharing recaps.
Below, we’ll be going through all of the elements in the recap. First up, recordings!
⏯️ Recordings: Your session replay
The Recording is the first thing you will see when you open a recap page. The recording
Recording modal / selecting language.
Multiple recordings
Sometimes, you may have multiple recordings from the same session. This occurs when you stop the recording and then restart it within the same session. You have the option to control whether participants can access all recordings or only specific ones. For more information, refer to the Sharing settings.
Trimming your recording
If needed, you can trim the recordings. To do so, click the Trim recording button located below the recording. This will open a new window where you can trim your recording. Simply drag the ends to the desired positions on the timeline or use the time input fields. For more precise trimming, you can also use the zoom feature on the right.
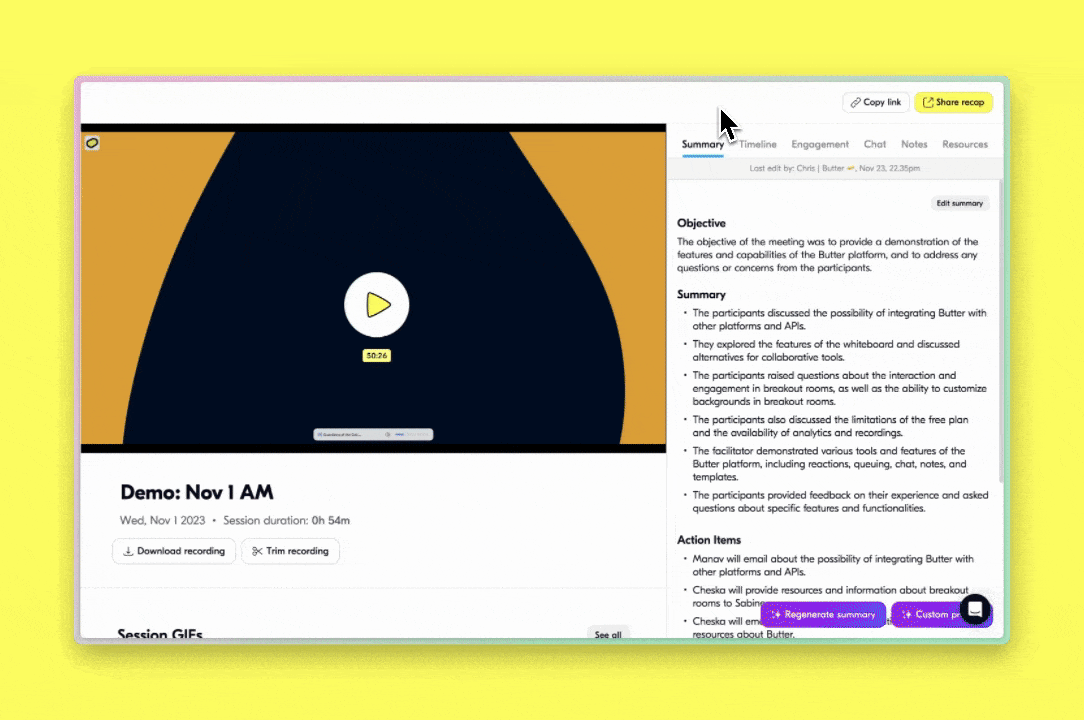
🧠 Summary: AI powered summary generation
The first item on the right-hand side of the recap is the Summary. When you record your session, Butter automatically generates a summary that will be available shortly after your session ends. It may take a few moments for the summary to get generated. In the meantime you’ll encounter the Butter Munchy, crunching away to generate your summary!

Editing summaries
If needed you can edit the summary or, if you prefer, you can write your own summary. Simply click the ‘Edit summary’ button in the top right to edit the summary.
Regenerating summaries for better quality
Although generative AI has undoubtedly come a long way, the quality of the output will vary from time to time. If your generated summary is too far off the mark, there is a often a good chance for a much better output simply by regenerating the summary. This can be done until you’ve reached a satisfying result.
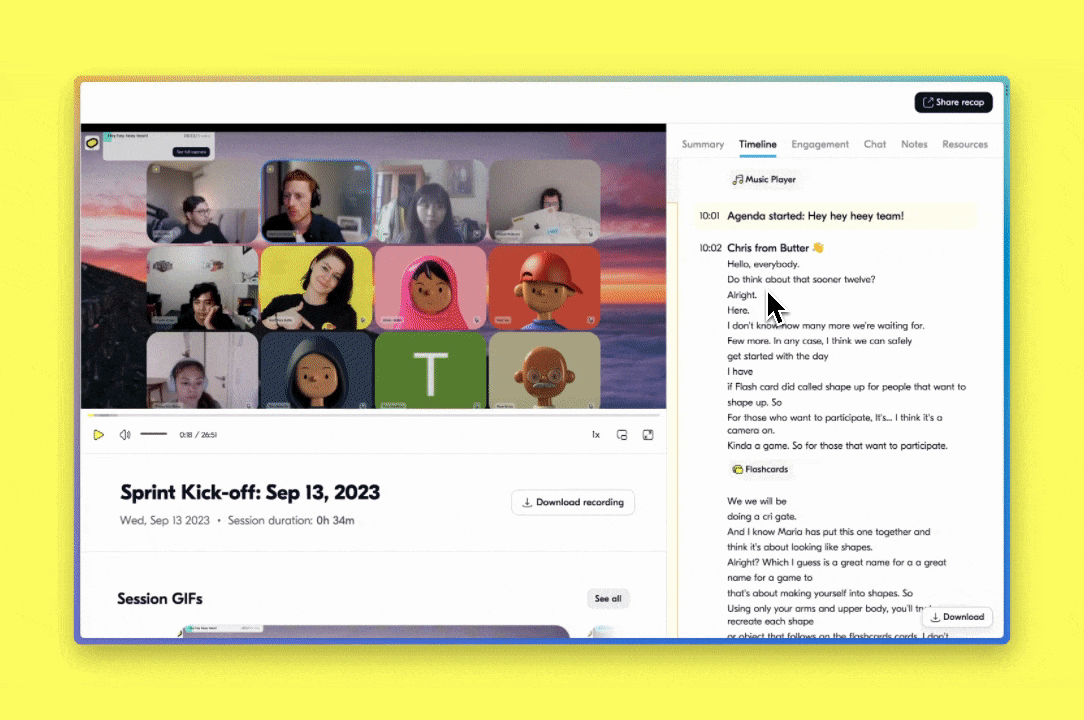
🕓 Timeline: Interactive transcript with agenda and events
Timeline is an interactive overview of your session and includes:
- the full session transcript
- events that occurred, such as someone raising their hand or the launch of a tool.
Both the transcript and events are timestamped. This means that when you click on them, you will be taken directly to that specific moment in the recording.
Additionally, you can click on any of the tool events to open the tool in a new window. For example, if a Miro board was opened at 8:34 during the session, you can click to jump directly to that moment in the recording and/or open the same Miro board in a new tab. It's mind-blowing! 🤯
Search and filtering
Looking for a specific moment? Use the search in the top or apply filters to more easily navigate through the Timeline.
✨ Highlights: Capture and share key moments
Highlights are clips of key moments captured from your session. Highlights work amazingly as a quick way to show people the best/most interesting/relevant parts of your session. Highlights are, naturally, super easy to create and share!
A highlight has a title, a description, a cover image and a start and end time. You can see all of the highlights from your session by by going to Session → Highlights.

Automatically generated
Butter will automatically create a number of highlights from your session. This makes it super easy for you to review, edit and share in a very quick manner.
Creating and editing highlights
You can create your own highlights from any session as well. There are two ways you can create a highlight:
- Click the
Add highlightbutton right below your recording - Hover any section in the Timeline and click the little highlight icon that appears.
Both of the above will trigger the highlight creator where you can now set or adjust the start and end time, add a title and description (if needed) and save your highlight. Easy peazy ✨

Sharing highlights
With your highlights created, it’s as easy as ever to share them! All participants will have access to the session highlights by default. And if you want to share a highlight with someone else, grab the direct link from the share button on the highlight!
People that click the link will be able to watch the highlight in a simple, focused window!

💬 Chat history: Every message sent
To access the complete chat history from the session, including threads, pinned messages, files, images, and message reactions, navigate to the Chat section.
Similar to the Timeline, all chat messages are timestamped. This allows you to click on a message to directly navigate to the specific time in the session when the message was sent.
✍️ Notes: Shared and Personal
In Notes you will find both the Shared notes as well as your own personal notes. Both are editable post session, to make sure that you can adjust and add any changes needed.
For the Shared notes, you can even control who has permissions to edit the notes after the session! Do you only want your collaborators to have edit permissions or should any participant have the opportunity to edit here? It’s all up to you!
📊 Engagement: Analyse session and participant engagement
One of the most challenging things when facilitating online sessions is to understand how participants are engaging and reacting to what is being shared (in other words ‘reading the room’). With Butter this changes!
Jump to Engagement in your recap, and you will see that Butter captures a lot of data to help you analyse how your engagement has been during a session, so you can evaluate and make adjustments accordingly.
Engagement data is captured both on an aggregate session level and on individual participant level. Let’s dive into more details about this below!
Session engagement
Session engagement provides aggregated statistics from all participants. In Session engagement, you will find:
- Avg. feedback rating
- Avg. video on (average time people in session had their video on)
- Avg. connection quality
- Device overview (see what device people joined from)
- Talk time graph
- Activity graph
- The Dropzone (shows when people joined and when they left the session)
- Reaction chart
- Soundboard chart
- Queue and Chat message counters

Participant list and engagement
The participant engagement stats give you many of the similar stats as you have in the Session engagement, just on participant level. In the first view you’ll have the full list of people who joined the session. Click on any person in the list, to access individual stats.
For each participant, you will be able to see:
- Session feedback (if shared)
- Talk time %
- Video on % (% of time user had their video on)
- Individual Talk time graph
- Connection quality
- Device used
- Activity graph
- Reactions and Soundboard charts
- Queue and Chat message counters
- Whether or not notes were used

⚡ Session GIFs: Spreadable snippets
Whenever you record a session, Butter will automatically generate a series of GIFs from your session that you can use to share with your clients, colleagues, community or even on social media to share your experiences.
Session GIFs are generated from highlights in the session.
You will find session GIFs on the left hand side, right below your recording.
💭 Participant feedback
All feedback and ratings shared by your your participants will be stored automatically in your recap. To see the feedback that has been shared, you can:
- Scroll down on the left side. The feedback will show below the session GIFs
- Click to
Resourceson the tab menu on the right. From here, selectFeedback - Click to
Engagementon the tab menu on the right.
Whenever someone shares feedback with you after a session, you will see a notification in Butter (and via email, if enabled).
Read more about how to set up and manage participant feedback.

🗂️ Resources & links
Need to find that Playlist, Presentation or Flashcard deck that was used in session? What about quickly finding the Google Doc or Miro board you were working on or links and images shared in chat? You’ll find all of this and more in Resources & links in your recap.
Every time you open a tool in a Butter session, it will be recorded and added to your recap. From here you can easily find, open or share it.
Additionally, all images and links that people share in chat are readily available for you here so you never have to scroll through long chat threads again!
Bonus: You have full control over which resources you want to share with your participants. See how to control your Recaps - Sharing settings.
✅ Poll results
Whenever you run a poll in your session, the result is captured and stored automatically in your recap. Go to Poll results to see results from all the polls you ran in your session.
You can control whether results are shared with participants of if they should only be available for collaborators. Change this in your sharing settings.
6. Sharing recaps
We’ve built the recaps so that they can easily be shared with anyone who needs access.
Access the recap sharing settings in the top right of the recap page.
Sharing with collaborators
All collaborators that you have added to a room, will by default have full access to the recap from sessions hosted in this room.
This means that a collaborator will be able to see the recap from a session, even if they haven’t participated.
Sharing with participants
Participants with a Butter account will automatically have access to a limited part of the recap. You can change the Recaps - Sharing settings on room level (coming soon) or on individual recap level.
Participants that do not have a Butter account, will not automatically have access to the recap.
Sharing via link
For anyone that don’t have a Butter account, but still need access to the recap, you can share a direct link.
Recap access via link is off by default. You can change this in the Recaps - Sharing settings
Sharing settings
Go to the top right of your recap and click on ‘Share’. From here, click on Edit permissions for either Participants or for Link access. You can now toggle any element in your recap on or off. When toggled an element off, it will not be visible to people who access the recap.
7. Recap storage and history
Recaps are stored on your Butter workspace. There are no limits to how many recaps you can store. Depending on your workspace plan, there will be a limit on how far back you can access your recaps. Recaps will be locked when your r
- Free workspaces have 7 days of recap history
- Starter workspaces have 45 days of recap history
- Unlimited and Enterprise workspaces have unlimited recap history
Read more about Workspace Plans & Pricing